Zoe’s wedding dress: Materials and construction
This is what went into the dress:
Main fabric
3.5 m of heavy silk crepe in ‘natural’
It’s fair to say that I had probably chosen the main fabric in my head as soon as I heard the words ‘wedding dress’. I love crepe, I love silk, I really love silk crepe but I don’t have the opportunity to work with it very often. It has an incredible drape and sophisticated, subtle sheen. I used it in it’s natural, undyed shade which is a pale ivory. I was lucky enough to be able to get a trade account at a wholesaler, I paid an amazing £21 + VAT /m.
Crepe is easy to sew with, it doesn’t slip around and in this weight it was very stable. It does have a lot of stretch on the bias so cut it carefully and tack before stitching. It doesn’t crease, so it’s great if you don’t want to be ironing constantly. But, if you want it to crease, don’t expect it to. It does like to fray after a while, so I was careful to finish all my seams as I went along.
Lining
3 m of silk habutai lining in ‘natural’
The wholesaler recommended me habutai as a lining, it was £7.50 + VAT /m. It’s impossibly fine and feels amazing to wear. It is quite sheer, if I were to undertake another project like this I’d probably use a couple of layers to line the skirt. It’s not the easiest thing to sew, it slides all over the place. Use a very fine needle, I was struggling with a 12, especially going through several layers. It frays a lot so I used concealed seams where possible.
Lace
3 m corded lace in ‘ivory’
This was £12 /m from John Lewis. More about choosing and sewing the lace.
Sundries
Light weight fusable interfacing
I used this on the bodice and bodice facing pieces to give these stability and prevent stretching. Next time I would use heavier interfacing on the facings but it’s not a big deal.
4 m 15 mm white grossgrain ribbon
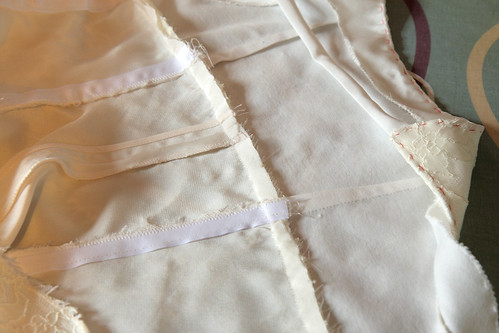
I used this inside the straps and sewn into the fitted section of the skirt seams. It prevented the seams and straps from stretching, gave them extra strength, and ensured that the seams lay flat in the direction I wanted them to.
5 packs of 12 mm cotton bias tape
I used this on to finish the flared section of the skirt seams, it was too bulky to be used on the fitted section so I zig-zagged those edges with the grossgrain. I also used it to hem the main fabric to prevent it fraying while I was working on the rest of the dress. It didn’t make to the neatest hem, next time I would simply press and fold.
A 60 cm concealed zip
I made sure the dress side opening finished below the widest part of the hips so that Zoe could step into it. Concealed zips are always a little bit tricky to sew in, but worth it.
4.5 m guipure lace edging
This was used to hem the lace skirt and cap sleeves
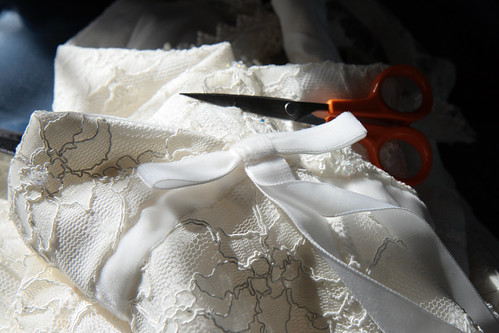
3 m of Beresford 16 mm velvet ribbon in ‘ecru’

Sewing on the velvet ribbon
This covered the join between the skirt and the bodice and formed a bow on the front of the dress.
200 3 mm Swarovski bicone coated beads in ‘crystal AB’
These were sewn onto the bodice lace in pattern, five in the centre of each large flower and one in the centre of the small ones.
The total cost for everything was about £200.
Construction
The dress construction is pretty standard. The bodice front has a crossover neckline in two parts with darts to form the bust shaping. The bodice back is one-piece and has darts that taper towards the waist. The darts run the length of the bodice, so it could have been cut without them, but they give continuity following the skirt seams.
The bodice has 4 cm facings in self fabric. The straps are also made from self fabric with grossgrain ribbon inside. I sewed a tubes the width of the grossgrain, used a knitting needle to turn them inside out, and fed the ribbon through using a yarn needle. The straps were sewn on according to the length and angle measurements when Zoe tried on the calico dress to insure that they covered her bra straps.
The skirt was made in seven panels, a centre front panel, two side front panels, two side back panels and two back centre panels. The centre back was cut in two panels to allow for extra flare at the back of the skirt, and to account exactly for Zoe’s back shaping. Her waist is slightly higher at the back than at the front which meant that angles had to be adjusted and either a back waist seam or a vertical centre back seam were required.

The skirt joined to the bodice, back is visible. Holding stitches keep the bodice facing in place. The skirt has grossgrain re-enforced seams.
The bodice darts were sewn first and pressed towards the centre, then the skirt pieces sown together with side seams pressed towards the front, the centre back seam pressed open and other seams pressed to the centre. The lace layers were made for the skirt and bodice then sewn to the fabric pieces with holding stitches. The bodice pieces were joined, with front crossover tacked in place, the facings joined to the bodice, then the skirt and bodice joined together with the seam pressed upwards. The zip went in next.
The hem was sewn. The lace had stretched from hanging, so the hem had to be re-cut to be 1 cm below the main fabric hem, the lace edging was sewn on.
The skirt lining was made using the same pattern pieces as the fabric, but the bodice was hemmed onto the bodice facings, so was cut to match the shape of the facings at the top. Lining seams were pressed in the opposite direction to main fabric seams in order to minimise bulk. The lining was sewn onto the bodice facing (hand-stitched around the cross-over) and hand-stitched onto the zip tape. The lining was hemmed 2 cm above the fabric hem.
The ribbon was hand-sewn around the join between the skirt and bodice, a bow made and sewn on aligning with the bodice and front skirt panel seams. The crystal beads were sewn on using a beading needle. The cap-sleeves were made and edged, and sewn into the underside of the straps and inside the bodice.
Sounds like a walk in the park, doesn’t it!