Photographing your work: Studio lighting on location

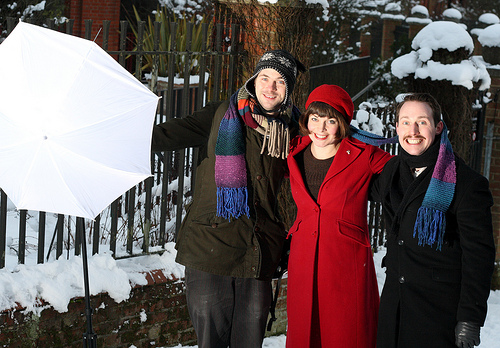
A fine team: Nick, Kathryn and Joseph
I wanted the photography for to be special, so I enlisted the help of a couple of talented friends; model and actor Kathryn and photographer and studio lighting enthusiast Joseph Hughes. We headed for Hampstead Heath, which had been transformed by a blanket of powder into the most incredible winter-wonderland I’d ever seen. This was my first shoot with studio lighting, I was amazed at the difference it made. Although this is an advanced technique it was much easier than I’d thought and I wanted to share the basic principles.
Location & conditions
The beautiful setting was not without its challenges. Although Kathryn did an excellent job of looking cosy, it was freezing and by UK standards the conditions were extreme. Our first location was an exposed hilltop, the trees offering no protection from the bitter winds. My hand froze to the point where I could barely use the controls, some camera mittens would have been good! Joseph and Nick struggled to hang onto the umbrellas, we gave up on that in search of more sheltered spots.
The batteries had a much shorter life in the cold, a particular problem with flash work. My camera battery managed under 100 shots, rather than the usual 500. We were hampered by other technical problems – the sub-zero temperature and damp air caused condensation and communication failures between camera and lens. My camera is not weather-proofed as the professional ranges are.
Snow can really mess with exposure, increasing exposure by one full stop helped, as did working in RAW, giving more scope to correct in post-processing. One the no-flash shots I took, the reflection from snow gave a dull, flat quality of light on the subject, devoid of highlights. It was the off-camera lighting that made my shoot a success.
Equipment
Lighting
Off-camera lighting requires a fair bit of kit, but the equipment below be picked up for less than the cost of a second hand, midrange lens.
- Two flashes with manual controls
- Two white, ‘shoot through’ umbrellas
- Umbrella stands
- A wireless flash trigger that fits on the camera’s hot-shoe (newer DSLRs often have this built in), and receiver
On the camera
- Canon EF 50 mm f/1.8 – a cheap, lightweight but fantastically sharp lens with an excellent quality of background blur thanks to the large aperture
- Canon EF 100 mm f/2.8 Macro – a good quality telephoto that gives a flattering perspective on faces, also great for detail shots
I didn’t use mine much, but it’s always nice to have a sturdy tripod that doesn’t wobble in a howling gale). Some other outdoor photography essentials are a lens cloth, a blower bulb (for cleaning the sensor if dust gets on it when changing lenses), weatherproof kit bag, spare batteries and spare memory cards.
The flash set-up
- Key flash: Set at 1/2 power, angled at 45 degrees camera left and above, triggered by wireless trigger
- Second flash: Set at 1/4 power, angled at 75 degrees camera right at subject height, triggered in optical slave mode
Although we moved from location to location, we used the flash set-up exactly as above throughout. It proved to be more or less foolproof! Below are some before and after shots, and some out-takes showing mistakes and how we corrected them.
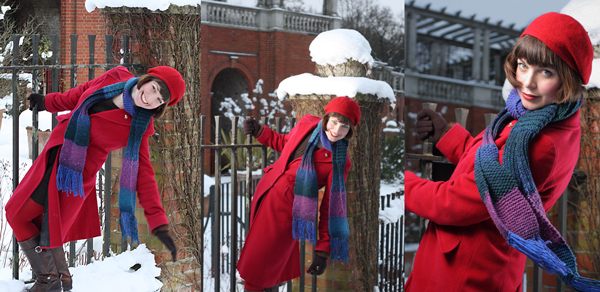
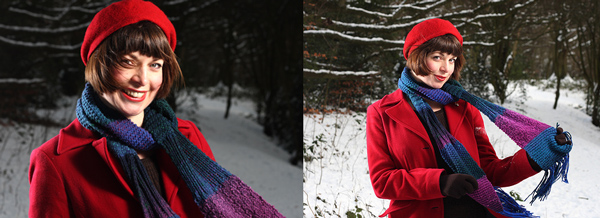
Left to right: No flash (natural daylight); one flash, camera left and above; two flashes. The images are un-retouched. Notice how much better the colour and contrast is in the third image, the flash really lifts the subject from the background.
Left: The background is too dark, making it look like Kathryn has been photoshopped into it. Right: Correctly exposing the background using a larger aperture corrects the problem.
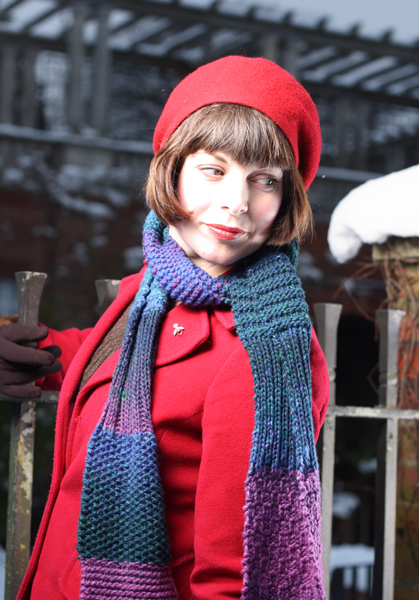
Here, Kathryn’s face is over-exposed because the key flash was too close. To be fair, Joseph was holding it up with one hand while hanging onto a railing with the other, his feet having turned into blocks of solid ice.
Massive thanks to Joseph, Kathryn and umbrella bearer, Nick. It was a real team effort and a fantastic day despite the cold. The results couldn’t have been better!
